2020 Porsche 911 Carrera (992) Engine Cover Trim Removal
- Anthony Kiger
- Sep 15, 2019
- 3 min read
Updated: Nov 8, 2020
Note: Perform at your own risk.
All Photos Property of Tony Kiger

Displayed above you will notice that the "992" has a trim cover over the engine bay (coolant, oil access area). The trim panel contains a piano black section (top most portion), 18 total vertical fins, separated by a dual led bulb mounted third brake light.
In regards to why I removed the trim, was to correct the piano black section of hard water etching from being stored at port. This I look forward to as it will be a continuous issue, being that this section is not protected like others in transport.
So lets begin!

First start by opening the engine cover. Release button located on the drivers door sill plate. Pull lever auctioned button to release cover.
Once opened, we will start by removing the dual led bulbed 3rd brake light.

With the engine cover open, look under the cover and you'll find a 10mm nut that holds the 3rd brake light from moving around. Remove the 10mm nut with cation not to drop it into a engine fan or the large cavity of the newly mounted intercoolers.

Once the 10mm is removed, we will begin prying up the 3rd brake light (use below image for reference). Start on the section nearest to the rear of the vehicle.

With the brake light detached, unplug the the light. Shown below is the brake light removed.


Next remove the "2" T30 screws that hold the entire panel from moving around as it is also held on by push clips.

With all the screws removed, you'll be able to locate most of the push clips on the underside of the panel through "6" access holes. All push clips are blue in color. In this case I used small thin angled needle nose pliers to depress the visible clips and push them up and out, loosening the cover.


Once you have the corners released, use a panel pry tool to work the back end of the panel, from corner inward to release the remaining clips. A gentle twist of the pry tool when under the panel is enough to pop the rest free. Keep a hand on the panel as it can slide off from the adjacent panel and hit the back glass.


With the panel now free from the vehicle we can take it over to our work station to tear it all down. Now the fun really begins!

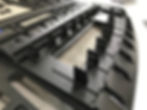
You can either work on it right side up of flip it over. Next, view the underside of the panel and notice how the fins attach to the panel. The back end has press tabs and the front merely slides in.


Pinch the tabs together, while pressing inward to release the end of the fin and slide out of the panel.

Notice on each side of the fin clip that there is a designation. "R" (Right), "L" (Left), 1-9. This notifies us of it's place holder on the panel.

Notice the louvered panel below also shows a designation for each fin.

With all fins removed, the piano black portion can be slid upward from the panel and off.

Each louvered fin holder can also be removed.

If you have made it this far, you should have successfully removed all the parts from the main panel.

Now time to thoroughly correct this piano black panel!

To reassemble, follow steps in reverse order. When it comes to tightening the T30 screws, make sure that the panel is slid all the way to the rear of the vehicle and is slid over the front edge of the lower fixed panel. Otherwise, when closing the engine cover, the piano black portion could make contact with the back glass.
Hope this helps someone, and look forward to more "Kigerology" to come!
Tony Kiger
"Kigerology" - Knowledge from the Kiger