2018-Present Lincoln Navigator Taillight Removal
- Anthony Kiger
- Feb 25, 2019
- 2 min read
Step 1: Open rear trunk hatch.


Step 2: Locate the plastic taillight shroud cover and pop it off (held in by plastic tabs, just pulls off).


Step 3: Under the shroud cover you will find "2" 10mm nuts and a "1" 8mm screw. Remove these 3 as the two 10mm's hold the taillight in, as the 8mm holds the bumper, fastened to the body.

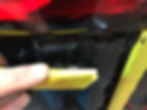
Step 4: Use painters tape as shown to protect the bumpers finish prior to using a panel pry tool (later to come)

Step 5: Locate the "T25" torq in each fender well (one per side) as well as the "5" plastic, Philips head retainers (per side) and remove.

Step 6: Starting from the tip of the bumper (nearest wheel arch), us a panel pry tool to separate the bumper from the body. (refer to picture)
Follow along the top of the bumper on its horizontal and vertical axis.


Step 7: With the bumper clips separated, you will find that there is on more clip under the taillight, on the top of the bumper. With one hand under the bumper, pull up and to the rear of the vehicle and the bumper will pull completely away from the body. You do NOT need to fully remove the bumper to remove the taillights.

Step 8: With the bumper pulled away a few inches, you can now unplug the taillight.
Step 9: After unplugging the taillight, pop the taillight out. To do so, pull the taillight straight back from the rear end and "2" plugs will let loose that remain holding the taillight against the body.


Step 10: Side taillights are removed and now onto the middle light.


Step 1a: With trunk hatch open, locate the hatch interior plastics.

Step 2a: Starting at the top of the interior hatch, pop off the plastics, starting with the top center piece and then the side middle pieces.


Step 3a: Using a panel pry tool, remove the interior grab handle cover, revealing "2" 7mm screws. Remove these screws as well.


Step 4a: Located at the trunk latch, there is a small plastic square cover, remove the 2"x2" cover.

Step 5a: Now to remove the lower interior plastic cover, prying from the upper most outer corners working your way in and then down the sides, popping the plastic clips from the body.


Step 6a: With the lower panel separated from the body, you can now disconnect the open/close button as well as the interior light.


Step 7a: Set interior plastic aside, to expose the interior hardware.


Step 8a: Locate the Washer Fluid line and pinch and pull the clip to disconnect.


Step 9a: Locate the taillight harness, and disconnect the "2" plugs.


Step 10a: Locate the plastic end covers on either end of the middle taillight. Pop these covers off to expose "2" 8mm nuts per end of the light. Remove all "4" total nuts.


Step 11a: Locate the "6" 10mm nuts retaining the center light to the body. These run in a row from left to right.


Step 12a: With the hardware not all removed, you can now lower the rear hatch, while holding onto the middle light. With the hatch closed, gently pull the taillight away from the body, making sure to guide the washer line and harness from the body.


Step 13a: Taillight Removal Complete!